Feature & Hole Recognition
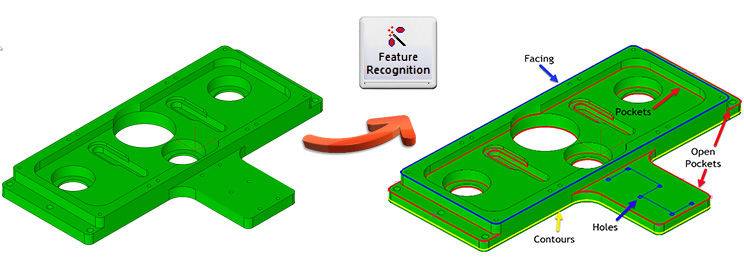
A total of 16 steps were eliminated on the part pictured above through Feature and Hole Recognition!
Solid models are the best way to streamline your programming within EZ-CAM. Once you import a solid model, we analyze it for features such as open and closed pockets, contours, holes, and islands and prepare you for our Tool Based Machining—”we will discuss this next.” Feature Recognition and Hole Recognition develop all the curves required to complete each operation; a “curve” is another word for a path or boundary. Manually creating curves would be a tedious process that requires you to select several faces, or you may be stuck clicking the start and end of each piece of geometry.
Each curve is assigned a color such as red, an open or closed pocket; yellow, an inside or outside contour; blue, a hole, facing boundary, or an island. These color identities make it easier to program features, especially when curves are nearly on top of each other. Not only are curves color-coded, but they are also positioned at the bottom of each feature for EZ-CAM’s automatic depth detection.
Tool Based Machining
Tool Based Machining creates a complete program when you follow these three easy steps: (1) Double-click your curve, (2) pick a feature, and (3) select a tool.
Imagine all your machining preferences are loaded by merely choosing a tool. Your focus is now on programming features and not how to machine them!
EZ-CAM has created a starting library full of machining templates. These templates are strategies formed by a tool’s diameter because RPM, Feed rates, depth of cut, etc., are all influenced by your cutting tool’s size.
Strategies found in our library are easily edited and can be tweaked to get the results you need. You can make new templates in no time using Windows copy & paste. Some reasons for creating custom templates might include machine type, materials, fixtures, user preferences, and more.
After you double-click a curve, the curve wizard appears and contains two drop-down menus–Category and Method.
• Category
Under Category, you will find the names of folders that contain your strategies. These Category folders are usually named after the type of feature you intend to machine.
• Method
Under Method, you will find a list of all the tool diameters stored in a Category. Select your tool diameter, and EZ-CAM will load all your machining strategies for the related feature.
With or Without a CAD File
Feature Recognition requires a solid model to provide you with path and boundary curves.
Hole Recognition uses a solid model to provide curves separated by characteristics such as start height, depth, and diameter. Hole Recognition can also use flat geometry to extract the diameter and group holes based on the same value.
Tool Based Machining produces bosses, pockets, sides, and islands with or without a solid model. This flexibility ensures ease of use and reliable programming under any circumstance.
After Feature & Hole Recognition, and Tool Based Machining
Curves generated through Feature Recognition and Hole Recognition are modified as if they were created manually. And operations made through the Curve Wizard can be edited in the background library or on the fly in your active document. Therefore, in both cases, we keep EZ-CAM’s natural flow, and our environment maintains user-friendliness.
Workstep Manager
As you create work steps, edit any or all of them right inside our Work Step Manager. You will find this incredible feature located at the bottom of your EZ-CAM window. The Manager lists every operation, every tool, and primary settings to be changed at the click of a mouse. Our programmers find it good practice to take a final look here before generating machine code–making sure everything is in order.
Consider Purchasing The Next Level
If you are looking to take ease of use to a whole new level, produce consistent results, and remove extra steps in your programming, consider upgrading or ordering EZ-MILL or EZ-MILL PRO vs. our EZ-Mill Express. We invite you to look at our video to see first hand how to use Feature Recognition, Hole Recognition, and Tool Based Machining https://youtu.be/uvDjkmiP8ho


